
My First Server
You want to put together a “computer music” server? There are lots of ways to do it at lots of different cost levels. Today, I’m going to set up a simple high-resolution music server based on a Mac Mini and a Benchmark DAC2 HGC converter and headphones amplifier (it’s really an audiophile standard preamplifier). It will be able to play high-resolution stereo files into an external DAC and then into headphones or speakers.
This is only one way to go of many. I’ve spent most of the morning installing the Digibit “Aria” server card and power supply into my Oppo BDP-105. I’m planning on putting together a video tutorial on the process but I can tell you that it’s a pretty simple procedure and gives you the amazing SonataDB and user interface that makes the Aria server unique. Of course, you can always use the Oppo all by itself as a music server.
I’m also pretty excited about the new HTC One phone that Sprint just sent me…thanks to the involvement of a reader who happens to be a big shot at Sprint. After my visit to Harman Kardon, he chimed in and told me that he managed to convince some other big shots at HK and HTC to work together to create the best sounding Smartphone available. I think I agree…bit I’m still getting used to working in the Android world so give a few days to report on the phone. It uses Clari-Fi technology too…and I want to do a thorough evaluation of that MP3 “enhancement” technology.
So here’s the basis idea for today’s simple server. I want to use my Mac Mini as the brain. Here’s the list of things that you need:
Basic Physical Setup and Connections
1. Mac Mini Computer (includes a mouse and keyboard)
2. Monitor (I will use an HDMI cable to connect the Mac to a 24″ monitor)
3. High-Resolution DAC (I will be using my Benchmark DAC2 HGC)
4. USB cable to connect the Mac Mini to the DAC
5. Playback software (I will be using Amarra)
6. Headphones or Speakers (with amplification)
7. High-resolution audio files (You can download some from this site click here)
Step 1: Set up your hardware. My pattern has always been to arrange the physical components first. This includes the Mac Mini, the Monitor, the keyboard and mouse and the DAC.
Step 2: Connect all components to AC power.
Step 3: Connect the keyboard and mouse to the Mac Mini. This involves plugging the USB output of the mouse to the keyboard and the keyboard then to the Mac Mini CPU (the actual computer).
Step 4: Connect the Mac Mini to the DAC. There are numerous USB outputs from the Mac Mini. Plug a USB cable to one of the open connections and then plug the other end into the USB input of the DAC. In my setup, this requires a cable that has the normal “flat” USB or “Standard Type A” connection for the Mac Mini side and the “standard type B” plug into the DAC.
Power Up and Software Player
Step 5: Start up the computer and log in, if necessary.
Step 6: Plug a set of headphones into the DAC or make other analog connections to your receiver or preamp.
Step 7: Acquire a high-resolution audio player for your Mac Mini. I downloaded the trial version of Amarra from Sonic Studio (you can visit their website and get it immediately by entering your email). There are other players but I highly recommend Amarra…their playback engine is second to none. It’s based on the same professional playback engine in Sound Blade, their high-end mastering software.
Software Configuration
Step 8: Go to the SYSTEM PREFERENCES of the Mac Mini. It has the icon of a few gears. You want to double click on the “sound” choice. This brings up the window shown below:

Figure 1 – This is the sound preferences window.
You want to make sure to select the DAC from the list of available OUTPUTS. Make sure you are changing the OUTPUTS and not the inputs. If you hear the sound coming through the Mac Mini speakers, you’ve messed up this step.
Step 9: The next thing you need to do is make sure your Mac Mini is going to send 96 kHz/24-bit audio out the USB output. This means you have to open the “Audio MIDI Setup” application, which is shown below. Select the DAC, the 96 kHz and 24-bit options for the output. See figure below:
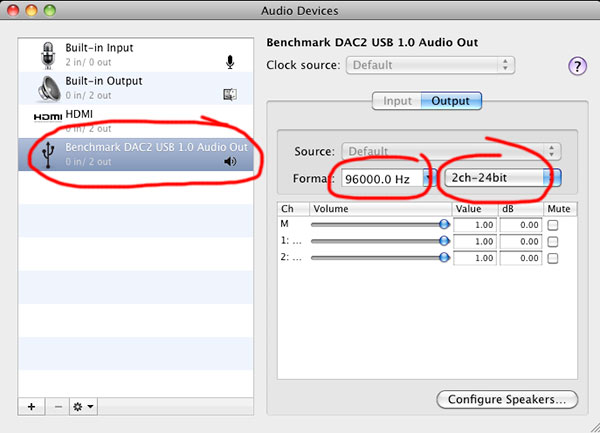
Figure 2 – The Audio MIDI setup application in the Mac Mini preferences.
Step 10: You’re also going to have to configure whatever music player application you decide to use. Of course, you can use iTunes directly using the setup described above but you will get better sound by opting for a specialized playback engine. There are a number of them (I’ll write a post on them in the near future).
For Amarra, it means going into the PREFERENCES and selecting an AUDIO OUTPUT device. They recommend ignoring the Audio MIDI setup mentioned above but I make sure both are targeting the DAC and are operating at 96 kHz/24-bits. Drag the icon of a “clock” adjacent to the DAC…in this case my Benchmark unit. See below:
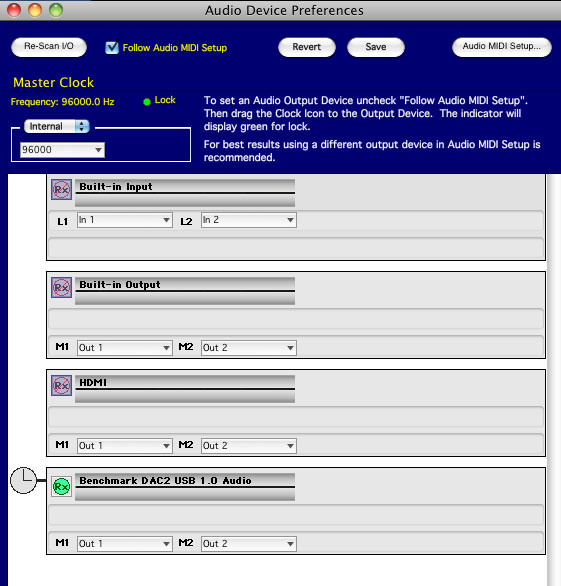
Figure 3 – The Audio Selection preference screen in Amarra. Make sure the clock is next to your selected DAC.
Playing Back High-Resolution Music
Step 11: Make sure that the DAC is looking at the USB input. Typically, high-end DACs allow you to select from a variety of inputs…you want to make sure that you’re accessing the USB connection. On the Benchmark DAC2, it means pushing a selector button until the blue light is solid and the selector says “U” for USB.
Step 12: I’m going to assume that you’ve loaded up some high-resolution audio. You can get the free files from my FTP site by clicking here or use any files in your iTunes library. Amarra uses the interface of iTunes to catalog and select music. Choose a high-resolution audio track and hit PLAY on the Amarra player.
Step 13: You can now put on your headphones or turn up the preamp level on you’re A/V Receiver and enjoy high-resolution, stereo music.
I’m planning on recording a tutorial video to accompany these server setups. Stay tuned. If you have any question, please fee free to ask them in the comments below.
Dr. Waldrep, there is a difference between ‘server’ and ‘playback system’. What you described in this article is a ‘playback system’… you can’t call it ‘server’.
Well, technically, it still is a ‘server’, since the computer streams/transfers the music data to DAC via USB. But the fact that it is tied to a single device makes it more of a storage system rather than a server. Also the rest of audio chain such as DAC, amps, speaker/headphones are not part of the server, strictly speaking.
If a computer is a ‘server’, it should be able to transfer the music data to multiple devices, including non-physically connected ones like smartphone (yes, it is possible to stream HD music files from your home storage to your smartphone in spotify style if you have a good internet services like Business class ones and unlimited data plan from your telecom carrier. I have done it once). Normally a server is only connected to Ethernet and/or wireless, transmit the data via internet and local access.
The trickiest part is connect that data from internet and local access to DAC. Sadly, there is no good solution in this area…. apple airplay is a big no in many cases (DACs based on VCXO won’t be able to lock the clock properly). Making a good network requires a good computer network expertise, money, AND time (expect a lot of trial-and-errors, since network is flicky to deal with)
I used to run a linux-based music server using Ubuntu as an OS, and Subsonic as both front and backend server/player, and it was such an enormous pain to configure everything correctly despite the fact that Subsonic is already well streamlined server package.
Computer Audiophile has a lot of goodies regarding this topic.
Example for a server
http://www.computeraudiophile.com/content/497-computer-audiophile-pocket-server-c-p-s-v3-zuma/
Extremely skimmed, limited, way too simplified description for server configuration (DLNA/uPnP)
http://www.computeraudiophile.com/content/524-complete-guide-hifi-upnp-dlna-network-audio/
You’re right, of course. But I’m not sure how many newbie’s understand the complexities of the subject and thus I started out with a very basic high-resolution system. A server…it’s not, but I’ll let it grow as I introduce more equipment and options.
Hi Mark!
I agree with your idea of putting up step-by-step instructions to take some of the mystery out of this hobby.
I’m a Windows guy, and I have my own idiosyncratic approach, which I’ll outline:
While I use the tagging capability of FLAC files to embed artist, album, composer, track and cover graphic tags, I don’t use those tags to organize and access my music, as I like to “cross-file” tracks under numerous artists’ names. The way I make that work is at the file system level, by creating a network of “alias” folders that access one copy of each folder under multiple names. Give that network to any tag-based server and ask it to play an album that’s been cross-filed and it will play each track several times before going on to the next.
I thus navigate by folder, with a tree set up this way:
“Phil’s Music Index”
“A – G”
“H – M”
“N – S”
“T – Z”
Under each of the second level folders are six or seven individual letter folders. At some point, when the list under a letter gets tediously long, I could subdivide a letter into two subfolders the way an encyclopedia breaks the S volume down into S-Sn and So-Sz
Under each artist’s name I have a subfolder for each album. [Tip – within an album folder, start each track’s filename with a zero-padded track number. 01. 02 will sort perfectly, but 1, 2 won’t – you’ll hear tracks 10 through 19 before you hear track 2. This is because file systems treat numbers in filenames as letters, and sort them as words, not values.]
I publish this folder tree to my Oppo BDP-93 over my household LAN using the free flea-weight oShare UPnP/DLNA server available at SourceForge, I fire up the Oppo, press the house-shaped “Home” button on its remote and choose My Network, choose oShare, and I’m in and can browse alphabetically to my desired music. The Oppo puts up a delightfully retro image of a turntable (a record-changer and tonearm, no less, judging by the stack of wax seen end-on!) behind the track info and album graphic while a track is playing.
The FLACs I buy from iTrax (5.1 stage perspective being my preference) play perfectly over my LAN – no burning of disks being needed.
I simultaneously put that same folder tree of music up through a different server I can reach from my Android phone’s internet connection while I’m in my car or walking around, but that’s much trickier. If there’s enough interest, I may show how in a later tutorial. (To avoid burning up my cellphone’s bandwidth cap doing this, I’ve built into my internet server the rule that it should transcode the music on the fly to mp3 )
PS The reason I like oShare is that it does not do any transcoding – so the Oppo gets the original FLAC from iTrax and plays it back with no compromises. I use the Oppo’s DACs and feed its 5.1 analog output into my receiver – an old Yamaha that was made before HDMI was invented – via six short RCA cables.
Oppos DACs – even in its $500 models – are very nice-sounding – as good or better than those in the Denon 2910 DVD / DVD-A player it replaced in my setup.
Very cool…I appreciate the tips.
Which do you like more music or audio equipment?
Myself I tend more toward music over fidelity because that path is open ending and might even include 78 RPM records. I think chasing fidelity is a dead end or at least a very narrow end because super resolving audio equipment makes a vast number of recordings unlistenable. I had a Benchmark DAC and it made poorly recorded music sound like an AM car radio (except in stereo). Of course the well made recordings sounded glorious but there just wasn’t enough of that music to justify keeping it around.
Mr. Waldrep is right that there is great potential in High Definition Audio, but that’s something going forward and until the next Ella Fitzgerald comes along I’m happy to listen to less than absolute sound. And on the cheap because spending tons of money on audio doesn’t return the same in practice.
My preferred set up is a 500GB WD Passport external drive (about $60) connected to a Sony BDPS6200 3D Blu-ray Player (currently $178 on Amazon), even at USB 2.0 rates that’s still 30 Mbps and the Sony can play just about any format including SACD. Way cheaper than the OPPO and the Benchmark but like I said this is Mid-Fi which I define as 90% of the enjoyment at 10% of the cost.
I like to think that I balance the need for amazing sound with a love of music that is compelling, well performed and has that intellectual/emotional thing going for it. With that said, I can’t listen to really crappy recordings. I can’t tolerate clicks and pops from vinyl LPs and I shudder at over compressed commercial music releases.
Even without the Benchmark, the Oppo at $500 does way more than the Sony Blu-ray player.
Nice post, thanks for the info.
I will have to try the Amarra, been using Clementine and it seems to work OK.
There is a lot of buzz that Apple will support flac and other formats soon.
With a few TB in iTunes, I’m going to tread carefully.
Regarding phones:
I’ve been listening to AIX 96kHz/24-bit FLAC files on my LG G2 smart phone since last September. I’m also able to play 192kHz/24-bit FLAC files from 2L. I use the Poweramp app, which has a 10-band graphic equalizer, to play the files. I think it sounds fantastic.
Not all servers that can be reached over the internet allow user control over transcoding, but some do.
Plex, which is cross-platform, and runs on Windows, Mac, and Linux, with clients for all of those, as well as Roku, iPhone and Android, will let you tell it to transcode video to a phone but not music.
BubbleUPnP, which I use on my phone along with its Windows server and its Foobar2000 plugin, lets a client specify server transcode settings independently for telephone company internet and WiFi. On WiFi I tell it “no transcoding” and the server sends a WAV stream at up to 96/24. On phone-based internet, I tell it to have the server send me 128kbps mp3s, which are better both for conserving that expensive bandwith and surviving tower handoffs while moving around. (I have it use my microSD card for caching, to conserve the much more limited internal memory.)
Both of these systems are free except for their phone clients – which cost around $5.
I just tested a stereo 192/24 FLAC album sent to my phone by BubbleUPnP over WiFi, a path that I’ve set to “Don’t Transcode” – it was sent to the phone as a 192/24 WAV, and played perfectly.
This is using a Samsung Galaxy Stratosphere II – one of the last phones to have all of the following: slide-out keyboard, replaceable battery, and microUSB slot. As the manufacturers are focused on making the devices super-slim, all of these features – which I consider necessary – are being phased out, and this model of phone is practically being given away for free with a two-year commitment to the carrier.
I can vouch for the convenience and sound of this kind of a solution. I have a Mac Mini running Amarra, connected to a NAD M51 DAC and am delighted with the sound. It’s not without its issues though! When I switch the NAD off the Mac Mini loses sight of its output ports and forgets where the DAC is. This can be frustrating for the wife when she has to attempt to restart components or navigate thru Amarra to reconnect the output when the NAD is switched back on.
On the server side, I also use PLEX to serve movies etc, just not music – I haven’t tried the music aspect because I like the convenience of iTunes. So the mac is a server, just not all of the time.
The mac can get a bit stuttery at times – not sure why yet. I maxed the memory on the mac to 16GB. It usually settles into its stride after a while (or after a reboot!).
Good luck with your build and I look forward to harring what you experience.
I’ll try to keep you posted on what I experience although I have to admit that I stole my wife’s office Mac Mini to do this assembly. I won’t get too much time to access the system. I use my laptop as the front end most of the time.
Hi – I’m not interested in a computer based server system, but I am interested in getting the best fidelity I can from from modestly large redbook cd collection, I currently have a sony 5000es blu-ray player that serves double duty as my cd player as well. Is is worthwhile to get an outboard dac to (hopefully) improve the redbook playback, thus using the sony as a transport, or should I just get an oppo 103 or 105 to keep things simple?
Thanks.
Michael
Depending on your budget, get an Oppo 103 or 105. The DACs on the 105 will more than deliver the best sound for your CD collection…and more.
Hi – thanks for the fast reply. Why is the Oppo 105 so much better than the 103, that is what am I getting for paying twice the price?
thanks again
MIchael Dixon
Michael, the BD products from Oppo include versions with audiophile tweaks including the better Sabre ESS DACs in the BDP-95 and 1-5. The 93/103 don’t use the same converters.
Hi again –
How should I choose between the 95 and the 105, (besides price); is the 105 better for redbook and hd audio than the 95? I don’t care as much about the video benefits as I do audio quality.
Thanks for your time I really appreciate your input and enjoy your site immensely.
Regards
Michael
The decision comes down to whether you need the high end DACs of the 105. If you convert internally, you would want the 105. If you have outboard DACs then go with the 103.
Thanks for these posts, really appreciate them, and spoke with you a couple of times at AXPONA. I have a very similar set up, but yet to achieve hi rez. Can I adjust these same settings on the S/PDIF (optical combo port) on the Mac Mini instead of the USB? Or is this specifically limited to the USB output for some reason?
Thanks!
The S/P DIF spec can handle 96 kHz/24-bits in STEREO. You need to set the Audio MIDI setup app to the higher rate.